3DPrintCAD › Student Studio
3DPrintCAD Student Studio
A 3D design classroom on the teacher's computer. Students join from their own browsers on the school network, get your tasks and design in the 3DPrintCAD editor - and everything they make is saved to your computer as they go.
- no internet needed
- no student accounts
- nothing to install for students
- Windows · macOS · Linux

How a class works
Install Student Studio on your computer, make a class and start it. The dashboard shows the address and the class code.
They open the address in their browser and type the code and their name - no accounts, nothing to install.
Write a task with text and pictures and send it - it pops up on every screen as a new project.
See everyone's work as they make it, open any of it live, change it - and export it for the printer.
Everything the teacher can do
Click a picture to see it big. Each one links to its step in the guide below.
Make a class for each group or lesson. One runs at a time; start it again any day - everything is kept.
How it works →The class code on or off; the student ID not asked, optional or required.
How it works →The address and a new 5-letter code each time the class starts.
How it works →The address and the code, big, for the whole room.
How it works →A title, what to do and up to 12 pictures. Save it as a draft, or send it at once.
How it works →Draft or sent, how many students started, and Work, Show in editor, Send / Hide, edit, delete.
How it works →Change the text or the pictures - students see the changes when you save.
How it works →Asks first and says how many students' work goes with it.
How it works →A tab for the class work and each task; the dashboard updates itself every few seconds.
How it works →Connected, working on it now, a picture of the work - Open, STL, 3MF and download.
How it works →The work in its own window, updated as the student saves; their other work in a list.
How it works →Change anything: it goes to the student, who waits until you give it back.
How it works →Their editor waits while you change their project.
How it works →Show in editor: your own project for the task, to build in front of the class.
How it works →Students' editors close; everything saved stays on your computer.
How it works →For good, after a popup that says how many students and projects go with it.
How it works →The port students use, when the school network needs another one.
How it works →A notice when a new version is out - never during a class; download it and install it over this one.
How it works →Every version and what changed in it.
How it works →For the students
It pops up: open it now or later.
The bar shows what is open and that it is saved to the teacher.
Their class work and every task, in one list.
The full guide
1Download
Student Studio version 1.0.0. Only the teacher's computer needs it. See what's new in each version.
| Computer | Download | Good to know |
|---|---|---|
| Windows 10 / 11 | Windows installer | 64-bit. Installs for your user - no administrator needed. |
| macOS, Apple chip | macOS (M1 and later) | macOS 12 or later. Apple menu → About This Mac shows the chip. |
| macOS, Intel | macOS (Intel) | macOS 12 or later. |
| Linux | AppImage .deb | 64-bit (x86-64). The .deb is for Ubuntu, Debian and Mint; the AppImage runs on most others. |
To check a download, compare its SHA-256 with the list in SHA256SUMS.txt.
2Install it
Windows
- Open the downloaded
.exe. - Windows may show Windows protected your PC (SmartScreen). Click More info, then Run anyway.
- Choose where to install it (or keep the folder it suggests) and click Install. Student Studio starts from the Start menu and the desktop.
- The first time Student Studio starts, Windows asks whether it may use the network (Windows Defender Firewall). Tick Private networks and click Allow access - without it students cannot connect. See the network and the firewall.
macOS
- Open the downloaded
.dmgand drag 3DPrintCAD Student Studio into Applications. - Open it from Applications. The first time, macOS says it cannot check the app ("Apple could not verify…"). Click Done (or OK).
- Open System Settings → Privacy & Security, scroll down to the message about 3DPrintCAD Student Studio and click Open Anyway, then confirm with your password. From then on it opens normally.
- If macOS asks whether the app may accept incoming network connections, click Allow.
Linux
- .deb (Ubuntu, Debian, Mint): open it with the Software app, or run
sudo apt install ./3DPrintCAD-Student-Studio-Linux.deb. Student Studio is then in the applications menu. - AppImage: make it runnable - right-click → Properties → Allow executing as program, or
chmod +x 3DPrintCAD-Student-Studio-Linux.AppImage- and double-click it. - If a firewall is on (for example
ufw), let the students in:sudo ufw allow 8780/tcp.
3The network and the firewall
Student Studio turns the teacher's computer into a small web server for the class. The students' computers must reach it over the network:
- The same network. The teacher's computer and the students' computers must be on the same school network (cable or Wi-Fi) - the Teacher Dashboard shows the address students open, such as
http://192.168.0.150:8780. - The firewall must let it in. Windows asks the first time Student Studio starts: allow it on Private networks. If you clicked Cancel: open Windows Security → Firewall & network protection → Allow an app through firewall, click Change settings, and tick 3DPrintCAD Student Studio for Private. On a network Windows calls "Public", set the school network to Private (Settings → Network & internet → the network → Private network) or allow Public too. macOS: allow incoming connections when asked, or in System Settings → Network → Firewall → Options. Linux:
sudo ufw allow 8780/tcp. - Some school Wi-Fi keeps devices apart ("client isolation"), so no computer can reach another. If students cannot open the address, ask the school's IT about it - or use a classroom router or the teacher's phone hotspot for the class.
- The port. Student Studio uses port 8780. If something else uses it, it takes the next one that is not in use (8781, 8782…) - always use the address the dashboard shows. To use another port (when the school's network needs one), open Settings in the dashboard, type it (1024-65535; empty = 8780) and click Restart now; the firewall may ask again.
4Make a class
Click + New class and give it a name, such as 7B - 3D design (click the name at the top to change it later). Then choose in How students join:
- Students need the class code (on at first): a 5-letter code, new each time the class starts, that students type with their name. Turn it off and students type only their name - then anyone on the network who opens the address can join.
- Student ID: Not asked, Optional or Required. A student who types an ID is known by it - the same ID again is the same student on any computer, even with the name typed differently. Without an ID, a student is known by their name.
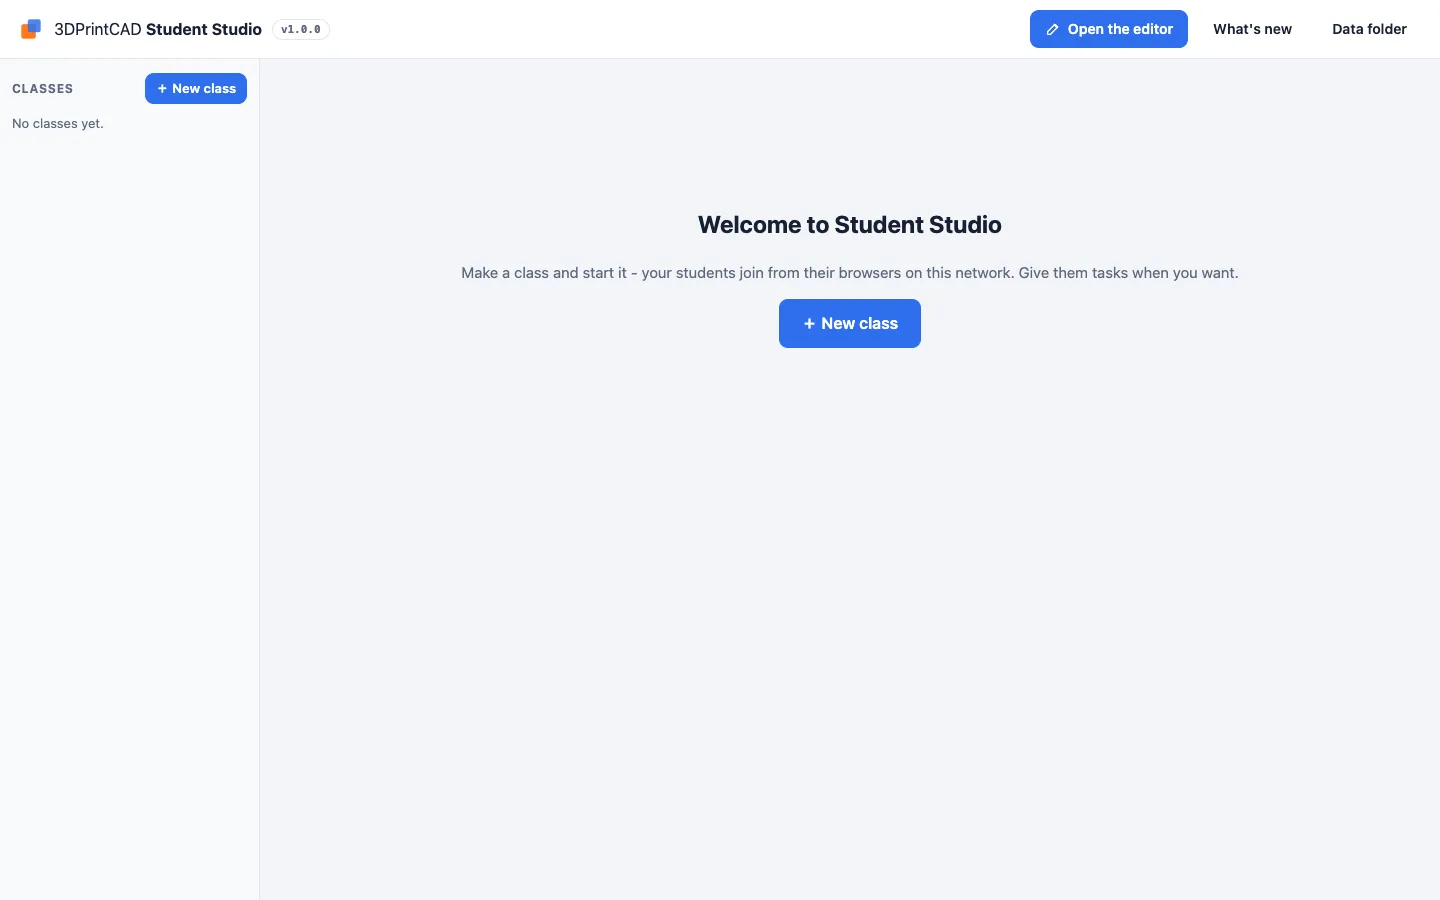

Every student gets one project for the class, the Class work, and one more for each task you give. Students cannot make other projects - everything they make in the class is in front of you.
5Tasks
A class does not need a task - without one, students work on their class work. When you want to give one, click + New task:
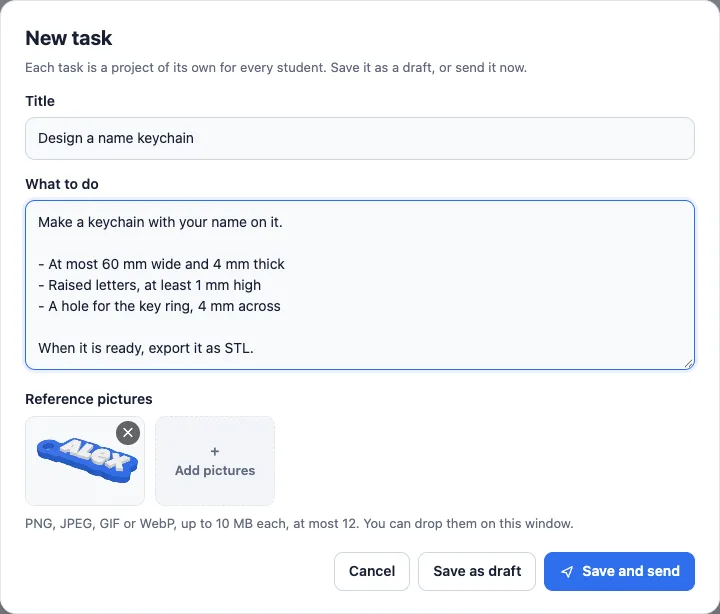
- Write the Title and What to do - what to make, sizes, steps, what to hand in - and add up to 12 reference pictures (PNG, JPEG, GIF or WebP, up to 10 MB each; click Add pictures or drop them on the window).
- Save as draft keeps it for later - students do not see it. Save and send sends it at once: it pops up on every student's screen, and each of them gets a new, empty project for it.
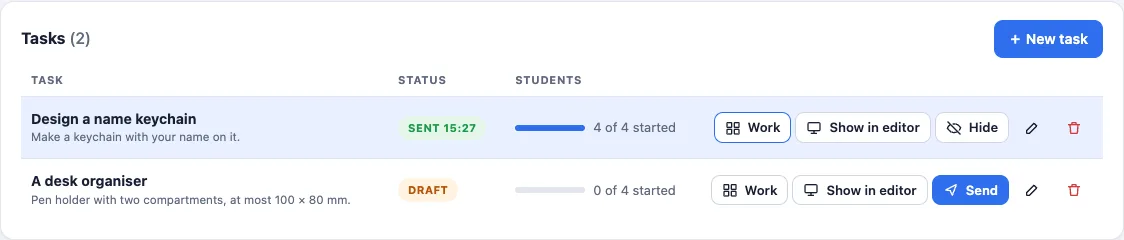
The Tasks list shows every task of the class: draft or sent (and when), how many students have started it, and its buttons:
- Work - the students' work for this task (below, in Students' work).
- Show in editor - your own project for this task, in the editor: show the class how to do it on the projector. It is kept on your computer and is not part of the students' work.
- Send a draft, or Hide a sent task (students no longer see it; their work for it is kept, and it comes back when you send it again).
- ✎ edits the task - for a sent task, students see your changes as soon as you save. 🗑 deletes it, with the students' work for it, after a popup that says how many students that is.
6Start the class
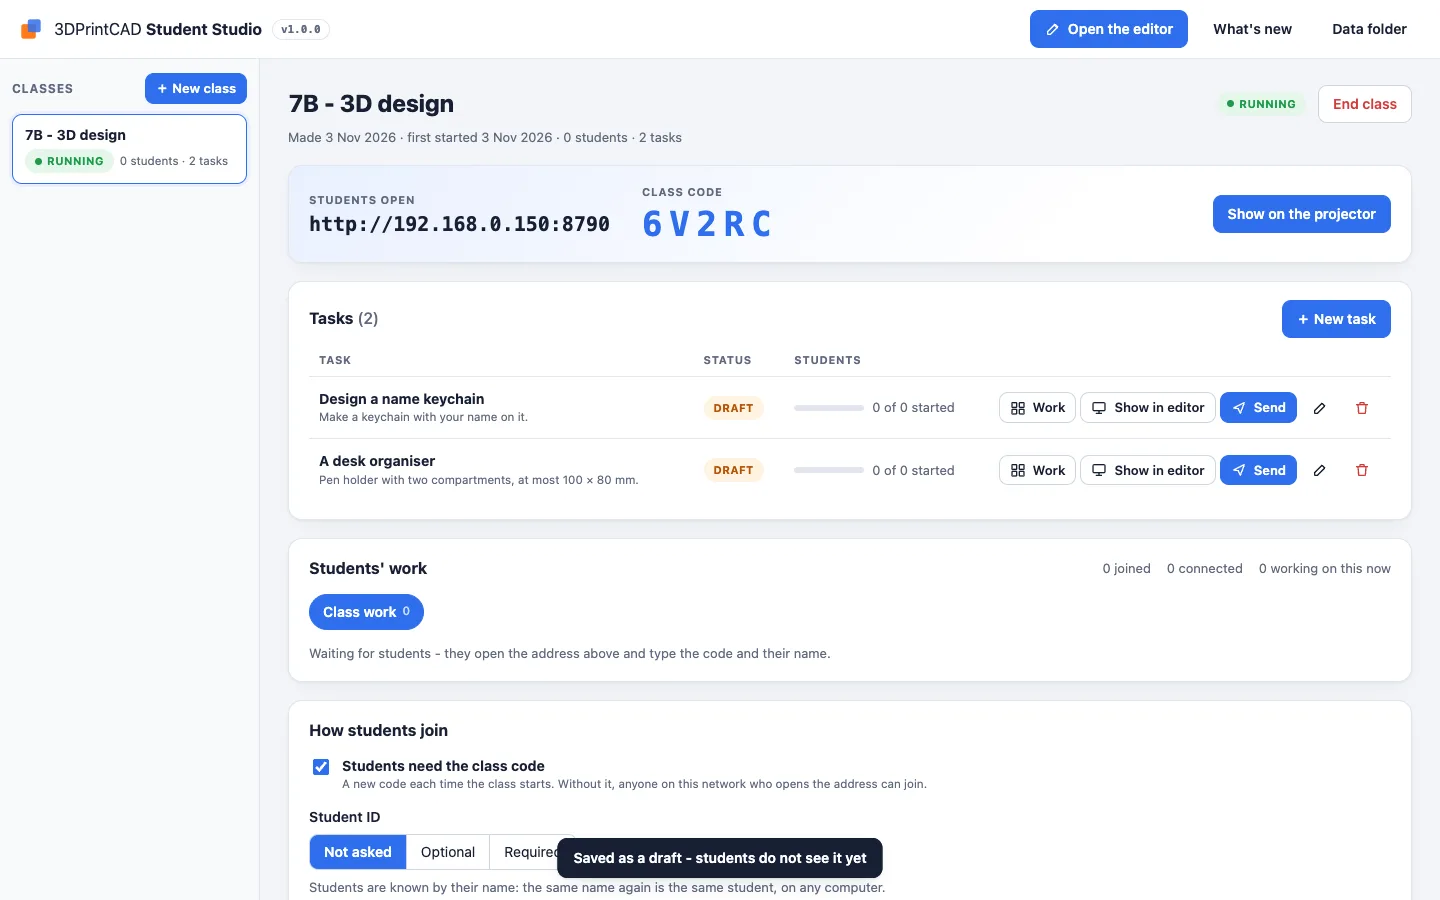
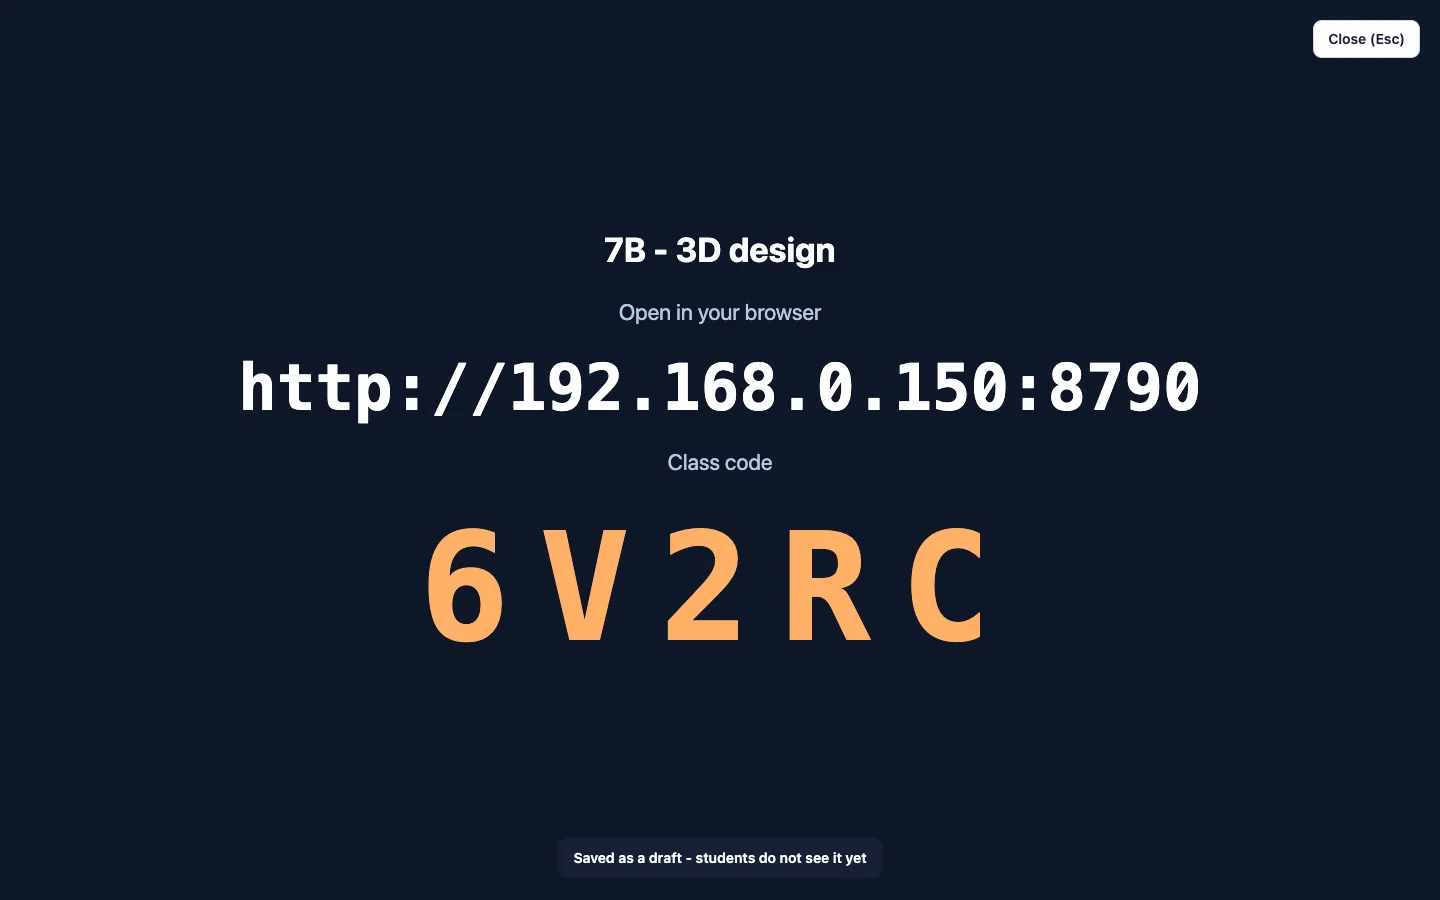
Click Start class. The dashboard shows the address students open and, when the class uses one, the 5-letter class code - a new code each time a class starts. Show on the projector shows both big for the whole room (Esc closes it). One class runs at a time.
7How students join
- The student opens the address in their browser - Chrome, Edge, Firefox or Safari on a computer.
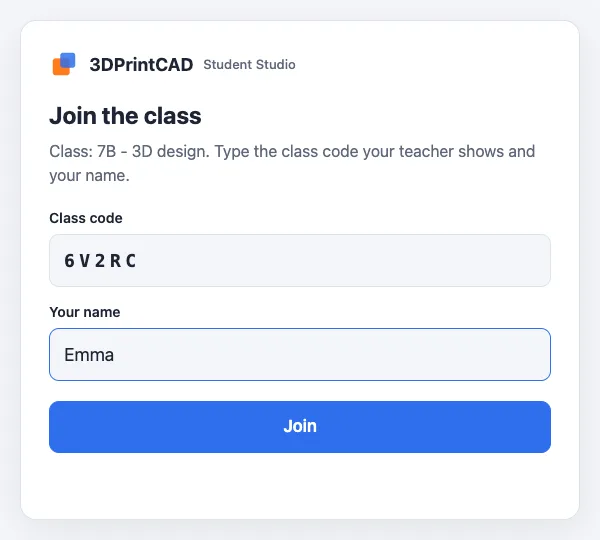
- They type their name - and the class code and their student ID when the class asks for them - and click Join. A wrong code, or a missing ID that is required, is refused with a message.
- The editor opens with their Class work.
Students on phones or tablets: the editor needs a computer with a mouse (a phone or tablet shows a page that says so).
8Students at work
A bar at the top of the editor shows what is open (the class work or a task), the student's name and Saved to your teacher with the time - the work goes to the teacher's computer every few seconds after each change.
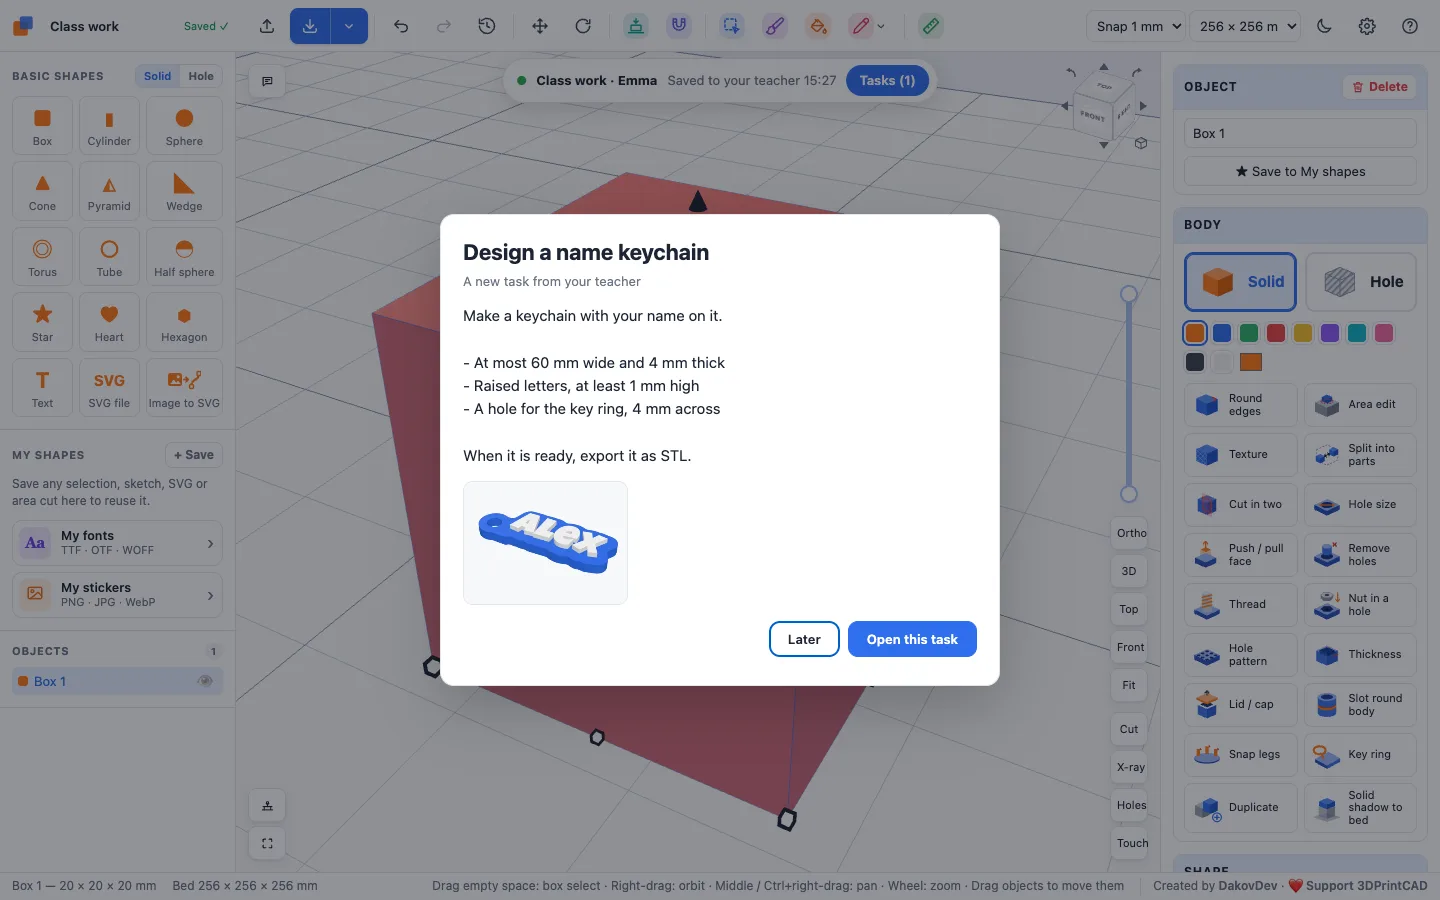
- When you send a task, it pops up: Open this task opens a new project for it (or Later). Task in the bar shows the task again - click a picture to see it big.
- Tasks in the bar lists the student's Class work and every task you have sent, with a picture of their work for each - a click opens it. This is their only list of projects: the editor's own projects screen and its New button are not there in class.
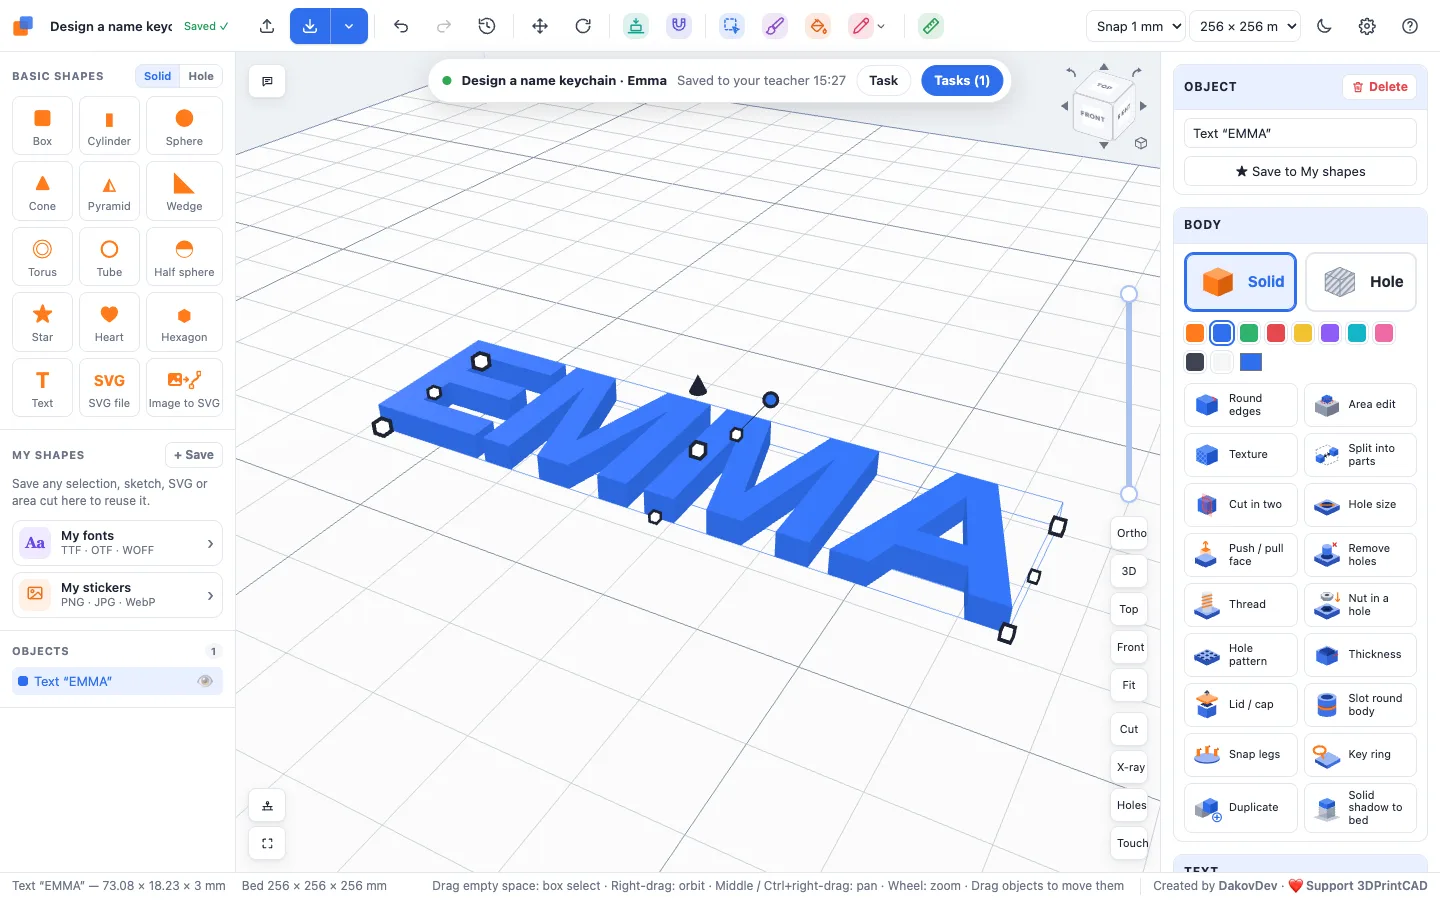
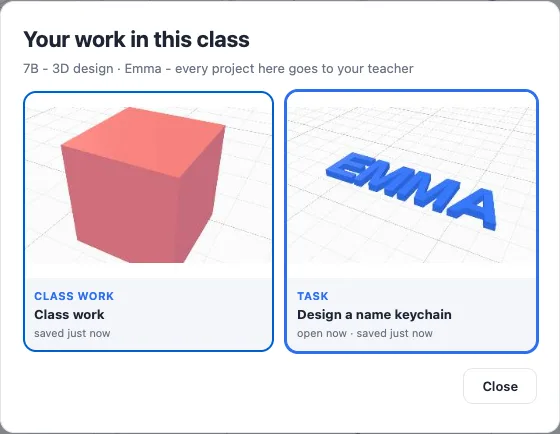
Students have the whole 3DPrintCAD editor: basic shapes, text, SVG files and Image to SVG, sketches, every body tool, paint, measuring and print prep, and STL / 3MF export. The generators of the website are not part of Student Studio.
The editor works only while the class does. If Student Studio is closed or the network is down for a few seconds, the editor is covered with The class is not reachable and waits; when the class ends, with This class has ended. Nothing is lost: the work stays in the student's browser and is sent as soon as the class is back. If a student moves to another computer, they join again with the same name (or the same student ID) and get all their work back.
9Students' work
The dashboard keeps itself up to date - every few seconds, nothing to reload. Students' work has a tab for the Class work and one for each task (the number is how many have work in it). Every student has a card for the work in that tab: a green dot while connected, Working on it now when they have it open, a picture of it and when it was saved. Its buttons:
- Open - the work in a window of its own, live: each time the student saves, it updates (the view stays where you turned it). The list in its bar has the student's other work in the class.
- Change it right there: the moment you change something, that project is yours for a while - if the student has it open, their editor waits (Your teacher is changing this project) - and every change you make is sent to the student. Click Give it back to … (or close the window) and the student carries on with your changes.
- STL / 3MF - the work as a file for the slicer (3MF keeps its colours).
- ⤓ - the work as a
.3dpcadproject file; it opens in 3DPrintCAD on the website (Projects → Import backup).
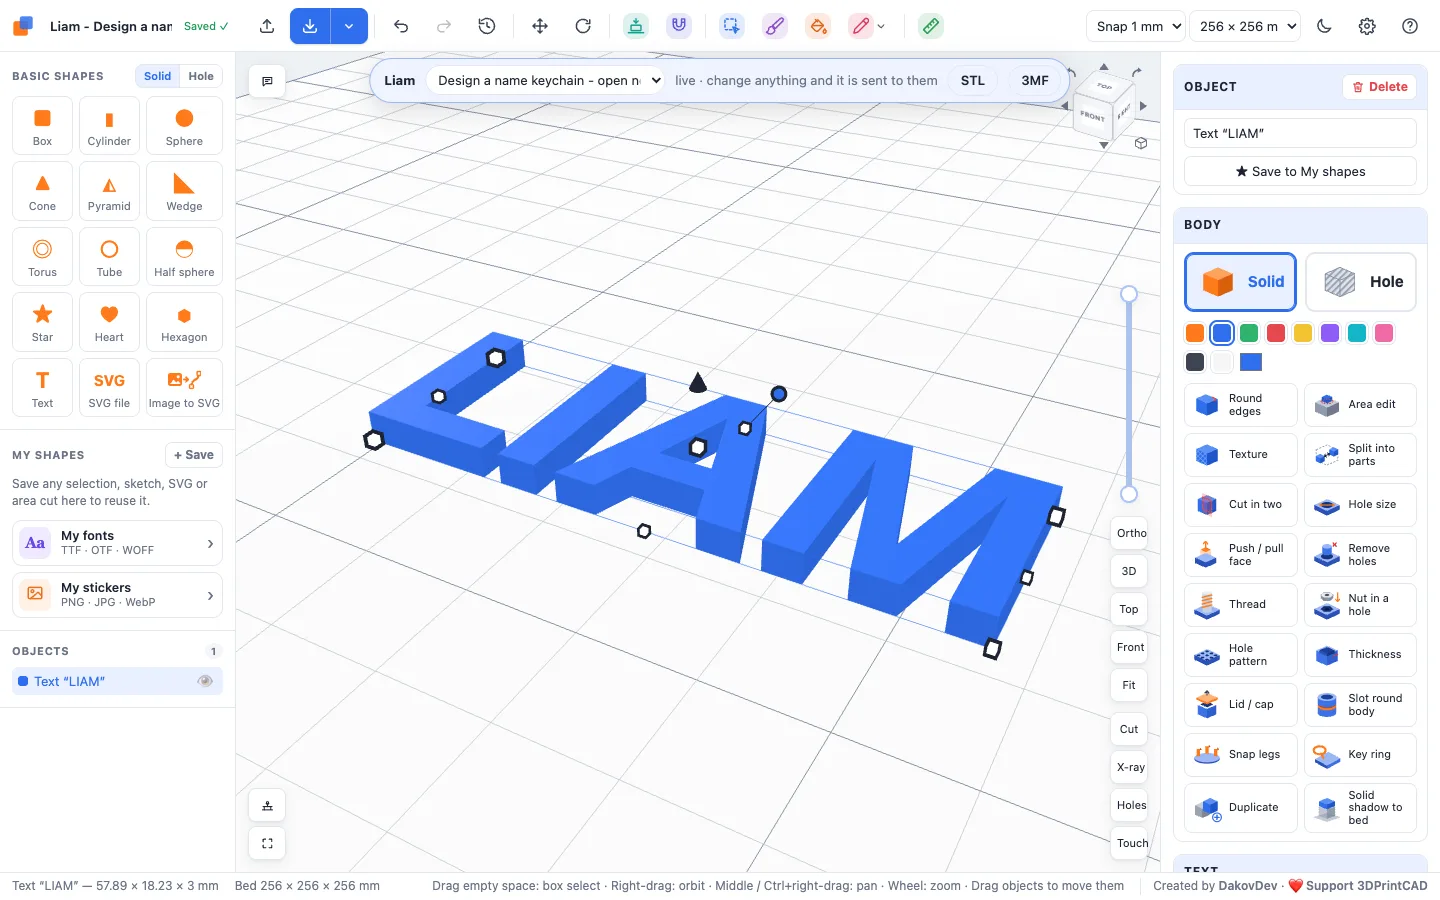
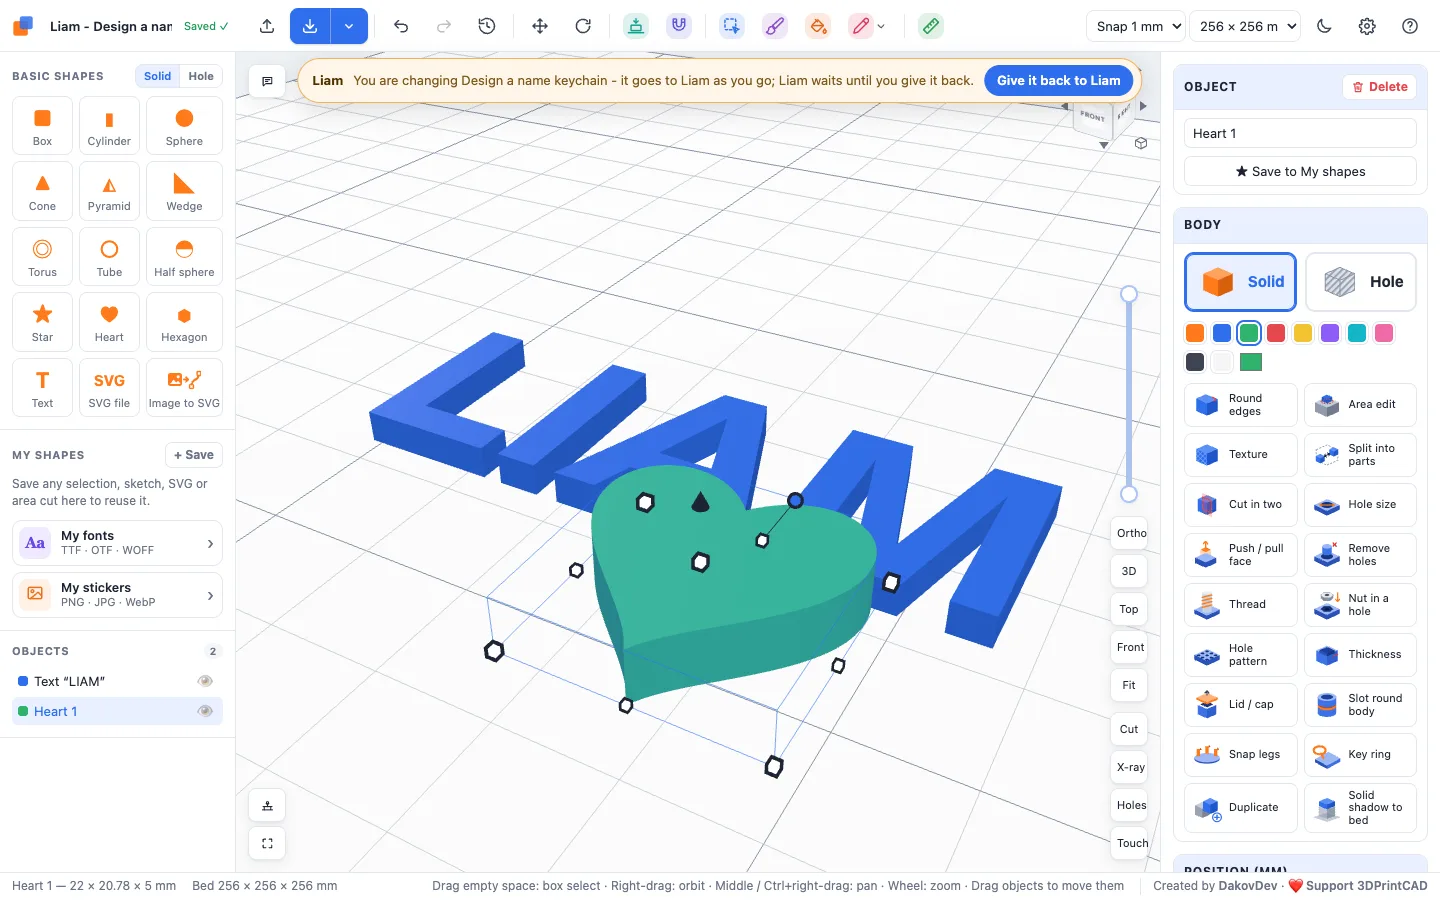
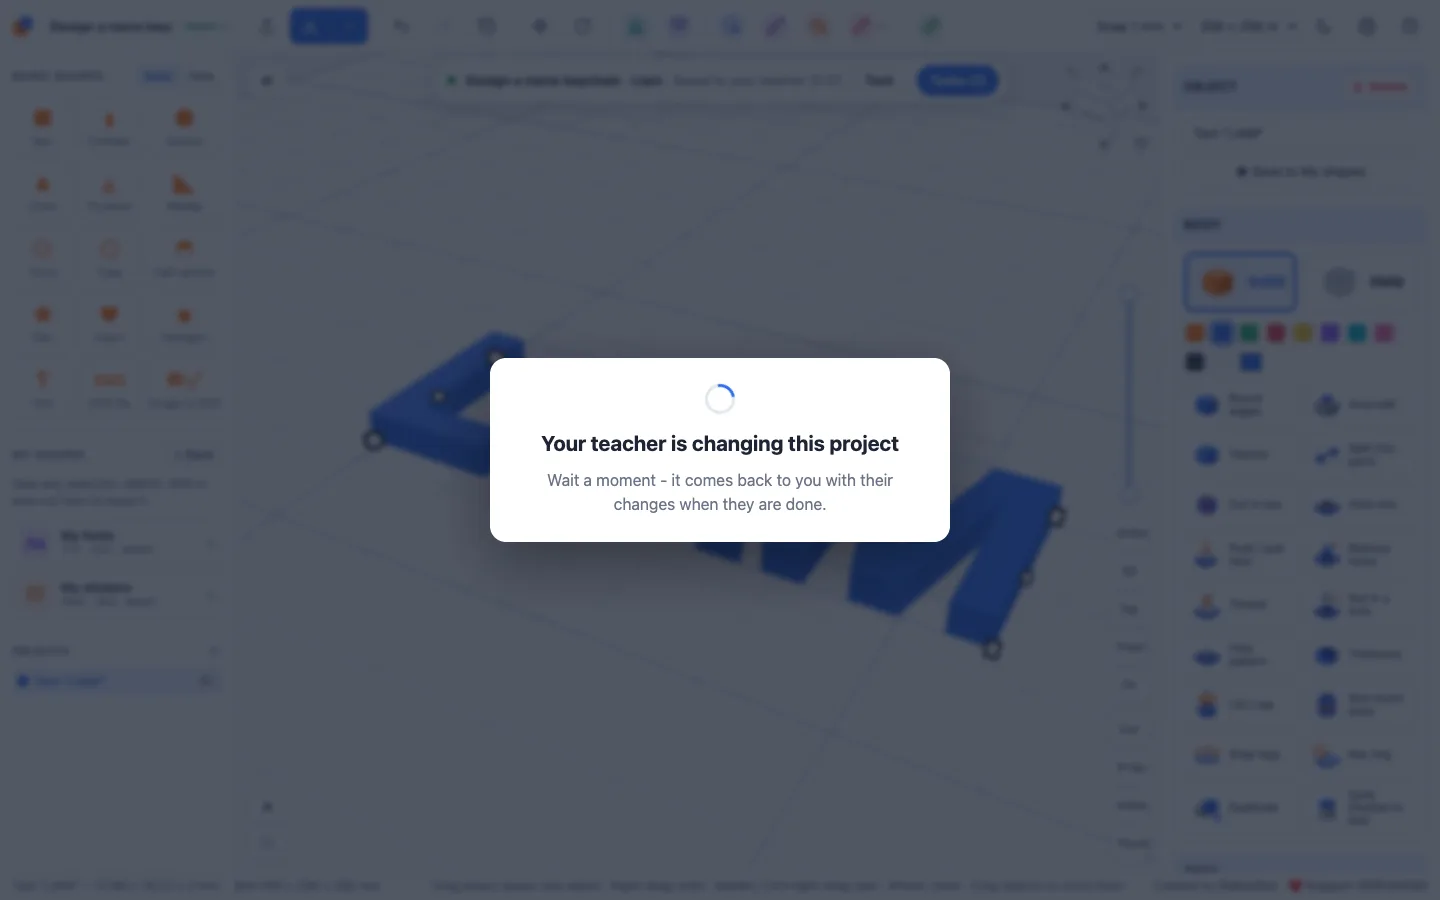
If the student saved newer work after you opened it, the window asks before you change it: load their newest, or keep yours.
10Show something on the projector
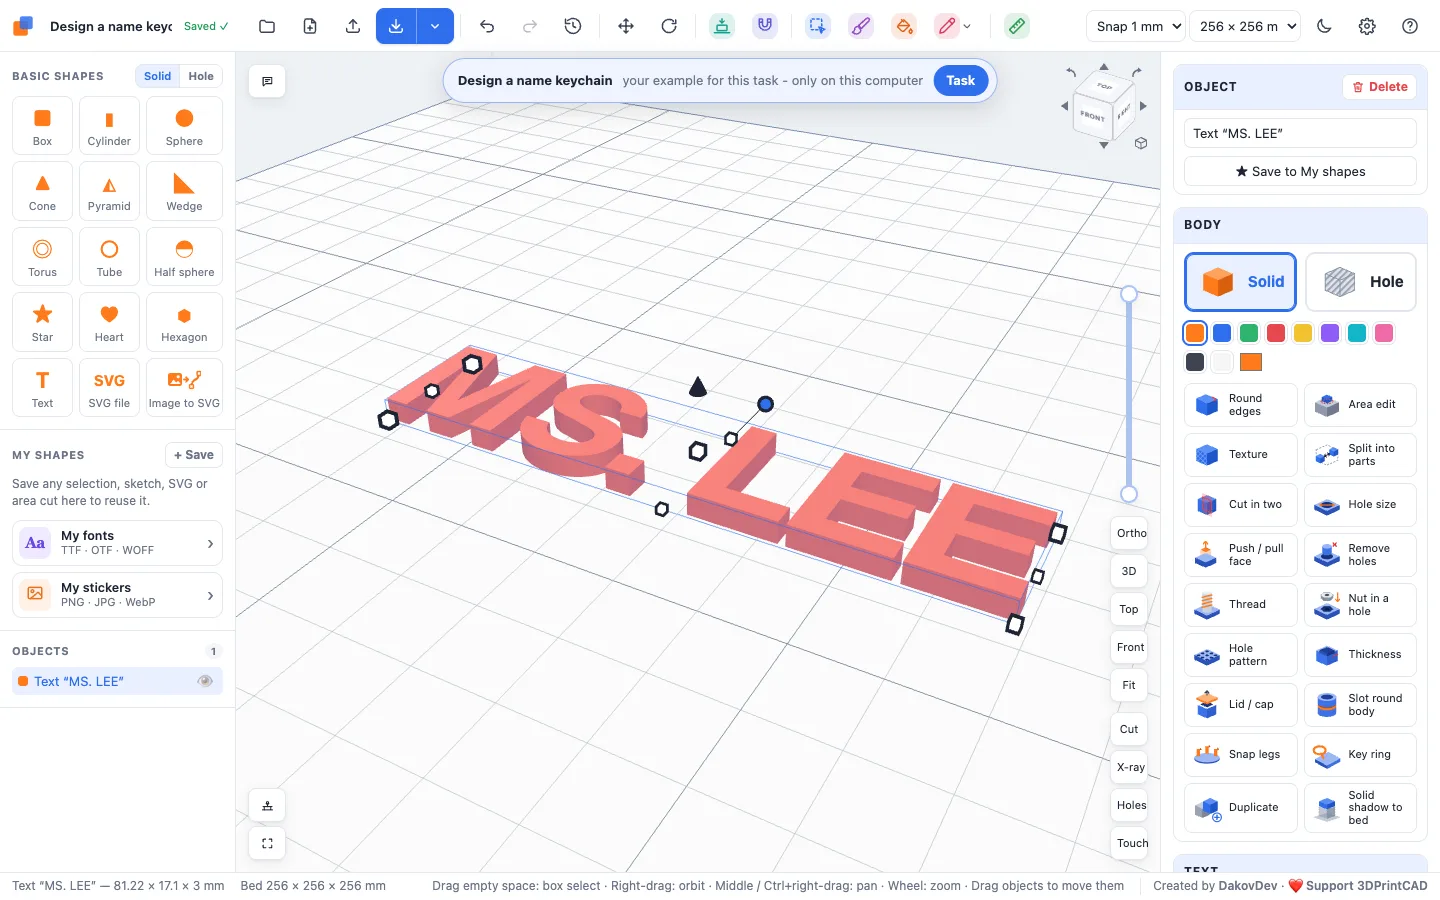
Open the editor at the top of the dashboard opens the 3DPrintCAD editor for your own projects, in a window of its own. Show in editor on a task opens your own project for that task, with the task's text a click away - build the example in front of the class. The editor's full-screen button (bottom left of the 3D view) fills the projector. Your own projects stay on your computer and are not part of any class.
11End the class
End class stops it: nobody can join any more, and the students' editors are covered with This class has ended (their work stays in their browser). Everything saved so far stays on your computer. Start again later reopens the same class with a new code; students join with the same names and carry on.
Delete removes a class for good: its tasks, their pictures and every student's projects are deleted from your computer. A popup says how many students and projects that is, and nothing is deleted until you confirm. To keep the work, download it from the students' cards first.
Closing Student Studio while a class runs asks first: while it is closed, students cannot join and their work is not saved to your computer.
12Where everything is kept
Classes, tasks, pictures and students' work are kept on the teacher's computer, in Student Studio's data folder - the Data folder button opens it:
- Windows:
%APPDATA%\3DPrintCAD Student Studio\classroom - macOS:
~/Library/Application Support/3DPrintCAD Student Studio/classroom - Linux:
~/.config/3DPrintCAD Student Studio/classroom
The data folder is separate from the program: updating, reinstalling or uninstalling Student Studio leaves it in place. Copy the folder to keep a backup, or to move your classes to another computer (close Student Studio first). Before a new version changes how the data is stored, it keeps a copy of the old data in backups.
13Updates
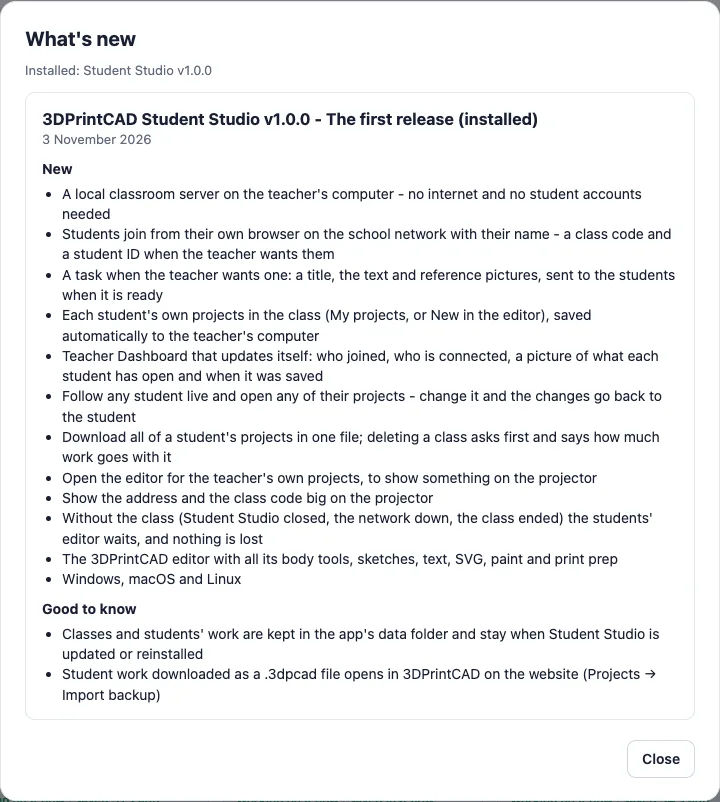
When the teacher's computer is online, Student Studio checks this site for a newer version and shows it at the top of the dashboard: What's new, Download and Later. Download the new installer from this page and install it over the old one - you do not need to uninstall anything first, and your classes and students' work are kept.
Student Studio never updates itself and never interrupts a class: while a class runs, the message says to install it after class. What's new in the dashboard lists every version's changes, also on the What's New page.
14Good to know
- Names or student IDs, not accounts. A student is their student ID - or, without one, their name - in a class: joining again with the same one (on any computer) is the same student, with the same work. That is how a student moves to another computer; it also means that someone who knows the class code and a classmate's name or ID could join as them and open their work. Keep the class code on, show it only in the room, and end the class when it is over - the next start gets a new code.
- Nothing leaves the classroom. Students' names and work stay on the teacher's computer and in the students' browsers. Student Studio contacts 3dprintcad.com only to check for a new version - no names, no work and no other data are sent.
- The teacher's pages stay on the teacher's computer. The dashboard and student work can only be opened in Student Studio on the teacher's computer - from the network they are refused.
- The editor is the 3DPrintCAD editor without the generators. Projects move between Student Studio and the website with
.3dpcadfiles. - Not guaranteed to be safe for every use. As on the website, check printed parts before you rely on them - see the Terms of Service.
Questions
Do students need to install anything?
No. Only the teacher installs Student Studio. Students open its address in their own browser (Chrome, Edge, Firefox or Safari on a computer) and type their name - and the class code or their student ID when the class asks for them.
Does Student Studio need the internet?
No. The class runs on the teacher's computer and the school network. When the computer is online, Student Studio only checks 3dprintcad.com for a newer version.
Where is the students' work kept?
On the teacher's computer, in Student Studio's data folder (the Data folder button opens it), and in each student's browser. Nothing is sent to 3dprintcad.com.
Why does Windows or macOS warn me when I install it?
The installers are not signed with a paid code-signing certificate, so Windows SmartScreen and macOS Gatekeeper do not know the publisher. On Windows click More info and Run anyway; on macOS open System Settings → Privacy & Security and click Open Anyway. Download Student Studio only from this page.
Students cannot reach the address - what now?
Check that the students' computers are on the same network as the teacher's, that the firewall allows Student Studio (Windows asks the first time - allow it on private networks), and that the school Wi-Fi does not keep devices apart (client isolation). A phone hotspot or a classroom router works when it does. See the network and the firewall.
How do I update Student Studio?
When a new version is out, Student Studio shows it on the Teacher Dashboard. Download the installer from this page and install it over the old one - classes and students' work are kept. It never updates itself during a class.
Can two classes run at the same time?
One class runs at a time on one computer. End one before you start the next - every class keeps its students and their work.
Can I change a student's work?
Yes: Open it from their card and change it. Your changes are sent to the student as you make them; while you work their editor waits, and Give it back (or closing the window) lets them carry on with your changes.
Do students need a class code or an ID?
You choose for each class in How students join: the class code on or off, and the student ID not asked, optional or required. A name is always needed.
Can students make their own projects?
No - each student has their class work and one project per task you send, and nothing else, so all their work in the class is in front of you. The editor's projects screen and its New button are not there in class.
Do I have to reload the dashboard?
No. It updates itself every few seconds, and a student's work opened with Open updates live as they save.
How do I get a student's work for the slicer?
STL or 3MF on the student's card, in the tab of the work you want (3MF keeps the colours). ⤓ saves it as a .3dpcad project file, which opens in 3DPrintCAD on the website (Projects → Import backup).
Run your first 3D design class
Install it on the teacher's computer, write the task, start the class.
Download Student Studio